ซื้อมาหลายวันแล้ว
เคยลง Ubuntu MATE 15.10
วันนี้เห็นข้อมูล Ubuntu Core เลยขอเก็บลิงก์ไว้ก่อน จะได้เอามาลอง
อีกตัวคือ Raspbian ระบบปฏิบัติการสำหรับ Raspberry PI เป็น Debian
ซัมซุงพอร์ต Tizen ลง Raspberry Pi มุ่งเป้าพัฒนาเป็นระบบปฏิบัติการ IoT
ที่มา Ubuntu Core
ติดตั้ง Ubuntu MATE 15.10
sudo apt-get install bzip
bzip2 -d ubuntu-mate-15.10-desktop-armhf-raspberry-pi-2.img.bz2
sudo ddrescue -D --force ubuntu-mate-15.10-desktop-armhf-raspberry-pi-2.img /dev/mmcblk0
ติดตั้ง Ubuntu Mate 16.04
ดาวน์โหลดได้ที่ Ubuntu MATE for the Raspberry Pi 2 and Raspberry Pi 3
sudo apt-get install gddrescue xz-utils
unxz ubuntu-mate-16.04-desktop-armhf-raspberry-pi.img.xz
sudo ddrescue -D --force ubuntu-mate-16.04-desktop-armhf-raspberry-pi.img /dev/mmcblk0
ติดตั้ง Ubuntu Classic image for Raspberry Pi 2
ดาวน์โหลดได้ที่ Get started with a Raspberry Pi 2 (or 3) หรือ Ubuntu Classic image for Raspberry Pi 2
แตกไฟล์ แล้วเขียน
# Note: replace /dev/sdX with the device name of your SD card (e.g. /dev/mmcblk0, /dev/sdg1 ...)

xzcat ~/Downloads/ubuntu-16.04-preinstalled-server-armhf+raspi2.img.xz | sudo dd of=/dev/sdX bs=32M
sync
น่าเบื่อมาก เวลา copy file ก็จะติดไปด้วย
วิธีลบทิ้ง ทำอย่างนี้
sudo find /Users -depth -name ".DS_Store" -exec rm -f {} \;
ส่วนไฟล์อื่น เช่น .localized
sudo find /Users -name ".localized" -depth -exec rm -f {} \;ส่วนไฟล์ .AppleDouble ที่อยู่ใน network drive ก็ลบด้วยคำสั่ง
find . -name '.AppleDouble' -printf '"%p"\n' | xargs rm -Rf
ยกเลิกการสร้างไฟล์โดย
defaults write com.apple.desktopservices DSDontWriteNetworkStores true
และวิธี backup ข้อมูลด้วย rsync
rsync -trv /Users/src/ /Volumes/drive/dest/
ตัวแปรสำคัญที่สามารถจะอธิบายถึงลักษณะผลตอบแทนของ บัฟเฟตต์ ออกมาก็คือ
Safe : ความปลอดภัย หรือความผันผวนของหุ้นที่ต่ำกว่าตลาด โดยพวกเขาได้พบว่า บัฟเฟตต์ มักเลือกซื้อหุ้นที่มีความผันผวนที่ต่ำกว่าตลาดอยู่เสมอ (เช่น Low Volatility or Low Beta)
Cheap : ราคาที่ถูก หรือ ส่วนต่างของราคากับมูลค่าของหุ้นในขณะนั้น โดยพวกเขาได้พบว่า มักเลือกซื้อหุ้นในราคาที่ถูกกว่ามูลค่าอยู่เสมอ (เช่น Low Value or Low Price-to-Book Ratio)
Quality : กิจการที่ดี หรือ ความสม่ำเสมอของผลกำไร อัตราการเติบโต และอัตราการจ่ายเงินปันผลที่สูง (Payout Ratio) โดยพวกเขาได้พบว่า บัฟเฟตต์ มักเลือกซื้อหุ้นที่มีคุณภาพของกิจการที่ดีอยู่เสมอ
ลองอ่านบทความฉบับเต็มได้ที่ mangmaoclub.com
เป็นครั้งแรกที่ Mac มีปัญหา หลังจากอัพเดท OS X 10.11 El Capitan แล้วเปิดเครื่องค้าง ก็เลยปิดเครื่อง แล้วก็เปิดไม่ได้ เปิดแล้วเครื่องก็ดับเอง งั้นดูวิธีในการเปิดเครื่องของ OS X กันนะครับว่ามีวิธีเปิดแบบไหนกันบ้าง
1. Recovery Mode
เปิดเครื่อง เมื่อได้ยินเสียง ให้กดปุ่ม Command R
2.Startup Manager
เปิดเครื่อง เมื่อได้ยินเสียง ให้กดปุ่ม Alt/Option
3.Safe Boot
เปิดเครื่อง เมื่อได้ยินเสียง ให้กดปุ่ม Shift
4.Reset PRAM
เปิดเครื่อง เมื่อได้ยินเสียง ให้กดปุ่ม Command, Option, P, and R
5.Verbose Mode
เปิดเครื่อง เมื่อได้ยินเสียง ให้กดปุ่ม Command V
6.Mac Single User Mode
เปิดเครื่อง เมื่อได้ยินเสียง ให้กดปุ่ม Command S
7.Enable Target Disk Mode
เปิดเครื่อง เมื่อได้ยินเสียง ให้กดปุ่ม T
Startup Keys Description
- Command-R Boot to OS X Recovery Mode
- Alt/Option Access Mac Startup Manager
- C Boot to CD, DVD, or USB
- N NetBoot
- Shift Safe Boot
- Command-V Verbose Mode
- Command-S Single User Mode
- Command-Option-P-R Reset PRAM
- T Enable Target Disk Mode
อ่านแบบเต็ม ๆ ได้ที่ 7 Mac Startup Options Every OS X User Should Know
เป็นวิศวกร ต้องเป็นผู้สร้าง
เป็นผู้สร้าง ต้องเป็นผู้ออกแบบ
เป็นผู้ออกแบบ ต้องมีการบันทึกวิวัฒนาการของผลิตภัณฑ์อย่างเป็นระบบ
...
วิศวกรที่ไม่เคยสร้างอะไร
ไม่ควรเรียกว่าวิศวกร
...
กระบวนการบันทึกวิวัฒนาการของผลิตภัณฑ์ของผม
พบว่า...ยังจัดการได้ไม่ดีพอ
บางช่วงเวลา...ก็เขียนบันทึกไว้
บางช่วงเวลา...ก็แทบไม่ได้เขียนเลย
ที่แย่กว่านั้นคือ...ที่เขียนบันทึกไว้หลาย ๆ เล่ม ไม่รู้ว่าวางเก็บไว้ที่ไหนแล้ว
จาก เบื้องหลังกระบวนการออกแบบผลิตภัณฑ์ของ Dyson จากงาน Dyson Design Talk
แก้ config ของ Apache
sudo nano /etc/apache2/httpd.conf
AllowOverride All
เปิดใช้งาน mod_rewrite
LoadModule rewrite_module libexec/apache2/mod_rewrite.so
Install PHP
brew update
brew install php@7.3
brew link php@7.3
brew services start php@7.3
เปิดใช้งาน php
LoadModule php7_module libexec/apache2/libphp7.so
เปลี่ยน DocumentRoot ของ web
sudo mv /Library/WebServer/Documents /Library/WebServer/Documents.old
sudo ln -s /New/Web/Folder /Library/WebServer/Documents
แก้ php config โดย cp /etc/php.ini.default /etc/php.ini
post_max_size = 16M
upload_max_filesize = 1024M

date.timezone = Asia/Bangkok
Restart Apache
sudo apachectl configtest
sudo apachectl -k restart
ที่มา macOS 10.15 Catalina Apache Setup: SSL
Install MariaDB
brew install mariadb
Start MariaDB
Service start
brew services start mariadb
Start without service
mysql.server start
Link data to new location
sudo ln -s /Users/mysql /usr/local/var/mysql
sudo chown -h user:group /usr/local/var/mysql
แก้ไข config file ~/.my.cnf
sql_mode = NO _ ENGINE _ SUBSTITUTION,STRICT _ TRANS _ TABLES

default-storage-engine = MYISAM
collation-server = utf8_unicode_ci
character-set-server = utf8
Auto Start
launchd In MacOS, create a file called /Library/LaunchDaemons/com.mariadb.server.plist with the following contents (edit to suit):
<?xml version="1.0" encoding="UTF-8"?>
<!DOCTYPE plist PUBLIC "-//Apple Computer//DTD PLIST 1.0//EN" "http://www.apple.com/DTDs/PropertyList-1.0.dtd">
<plist version="1.0">
<dict>
        <key>Label</key> <string>com.mariadb.server</string>
        <key>KeepAlive</key><true/>
    <key>RunAtLoad</key><true/>
    <key>LaunchOnlyOnce</key><false/>
    <key>ExitTimeOut</key><integer>600</integer>
        <key>WorkingDirectory</key><string>/usr/local/var</string>
        <key>Program</key><string>/usr/local/bin/mysqld</string>
        <key>ProgramArguments</key>
        <array>
        <string>/usr/local/bin/mysqld</string>
        <string>--user=_mysql</string>
        <string>--basedir=/usr/local/opt/mariadb</string>
        <string>--plugin-dir=/usr/local/opt/mariadb/lib/plugin</string>
        <string>--datadir=/usr/local/var/mysql</string>
        <string>--log-error=/usr/local/var/mysql/Data-Server.local.err</string>
        <string>--pid-file=/usr/local/var/mysql/Data-Server.local.pid</string>
        <string>--sql-mode=ERROR_FOR_DIVISION_BY_ZERO,NO_AUTO_CREATE_USER,NO_ENGINE_SUBSTITUTION</string>
        </array>
</dict>
</plist>
Then from a shell, run launchctl load /Library/LaunchDaemons/com.mariadb.server.plist and MariaDB will run immediately, and also upon reboot.
Fix the 2002 socket error first if you haven’t done so from the MySQL section-
sudo mkdir /var/mysql
Location -> /usr/local/Cellar/mariadb/{version}
Data location /usr/local/var/mysql/
sudo ln -s /tmp/mysql.sock /var/mysql/mysql.sock
Start MySQL
sudo /usr/local/mysql/support-files/mysql.server start
Stop MySQL
sudo /usr/local/mysql/support-files/mysql.server stop
Restart MySQL
sudo /usr/local/mysql/support-files/mysql.server restart
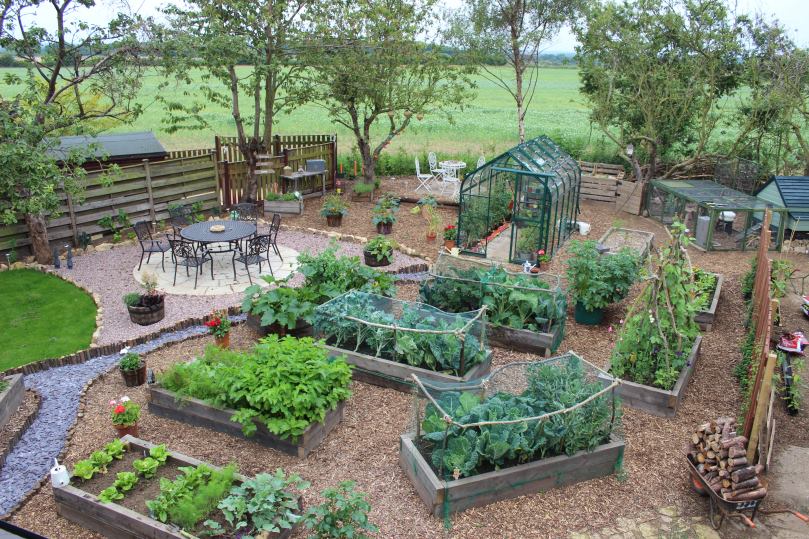
ตรงตามแนวความคิดของเราที่จะตกแต่งสวนให้เป็นสวนกินได้ แต่ไม่ค่อยมีหัวทางด้านศิลป์
ตอนนี้รอให้ปรับพื้นที่ให้เรียบร้อยก่อน แล้วค่อยดำเนินการ ระหว่างนี้ก็หาแบบ ร่างแบบไปก่อน
ลองตามไปดูเพิ่มเติมได้ที่ pickleshlee.wordpress.com
การฝัง Web Font กับไฟล์ CSS เป็นการลดจำนวน request ให้เหลือแค่ไฟล์เดียว ซึ่งจะช่วยลดเวลา เพิ่มความเร็วในการโหลดเว็บ โดยการ Encode ไฟล์ Font โดยใช้ WebFont Generator เช่น fontsquirrel.com มาช่วยแปลง Font และสร้าง Stylesheet แบบ base64
วิธีการ
แปลง Font ด้วยเว็บ fontsquirrel.com มีทริกสำหรับ Font ภาษาไทยที่จะต้องเลือก Subsetting เป็น No Subsetting ลองดูวิธีการได้จาก www.tutor4dev.com
นำเอา css ที่ได้มาใส่ในเว็บ
ส่วนใครอยากใช้วิธีการติดตั้ง Font แบบเดิม ก็ลองเข้าไปอ่านบทความได้จาก วิธีใส่ฟ้อนต์ไทยลงในเว็บไซต์ ด้วย CSS3 @font-face แบบ Step by Step
มีแหล่งดาวน์โหลด Fonts ฟรี ๆ หลายที่ ลองแวะเข้าไปดูได้ที่ www.designil.com
ที่มา www.tutor4dev.com , fontsquirrel.com
HTML5 จะส่ง attribute data-xxxx ด้วย lowercase เสมอ เช่น
<a id="mytag" href="sg-box" data-maxWidth="60%">Link</a>
ค่าของ $("#mytag").data("maxWidth") จะเป็น undefine โดยจะกลายเป็น $("#mytag").data("maxwidth") แทน
แต่มีวิธีการให้สามารถส่งเป็น case sensitive ได้โดยใช้
<a id="mytag" href="sg-box" data-max-width="60%">Link</a>
data-max-width="60%" จะถูกแปลงเป็น $("#mytag").data("maxWidth")
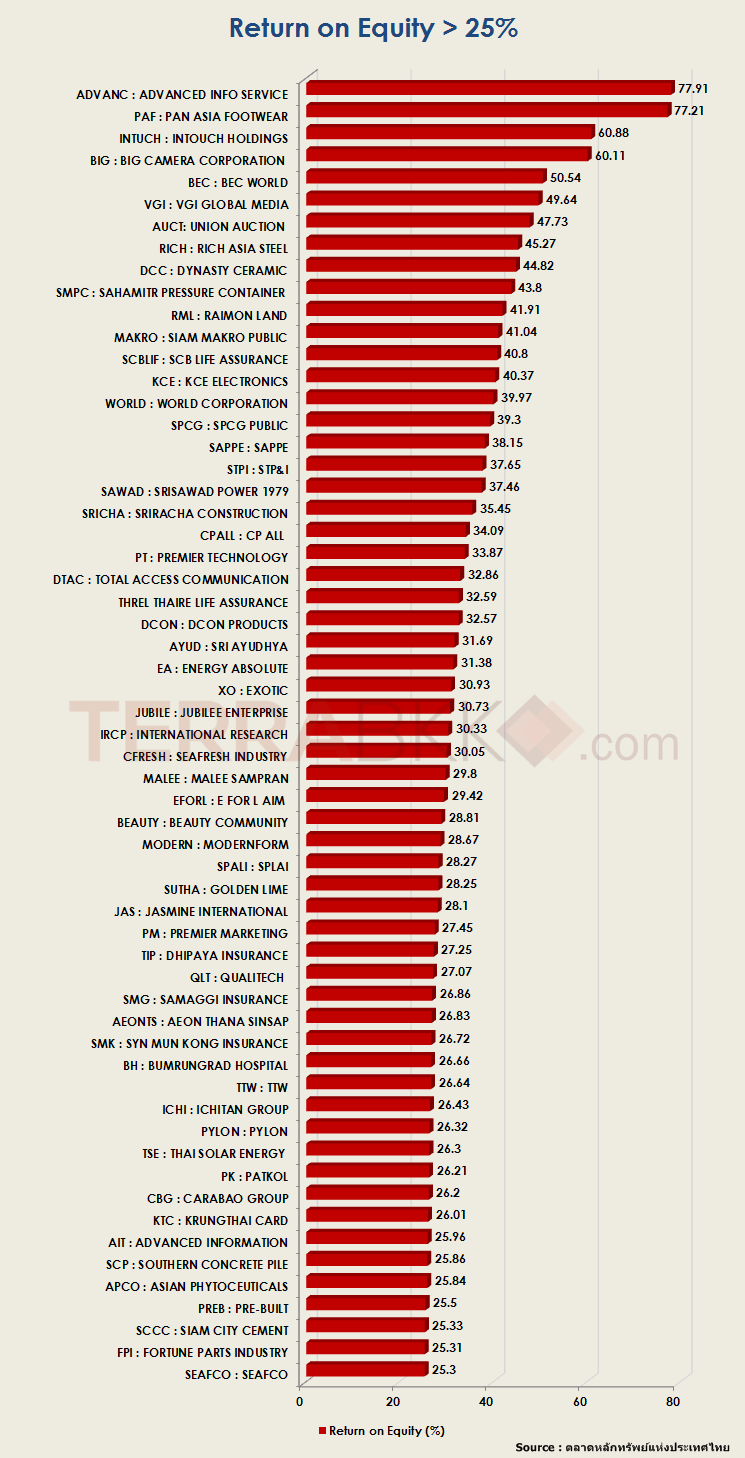
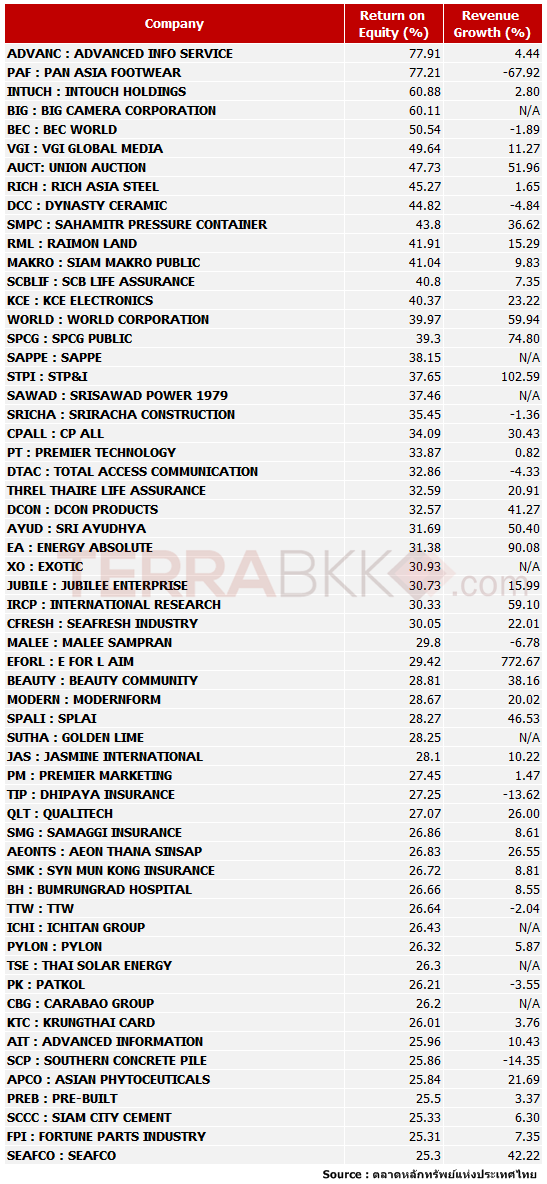
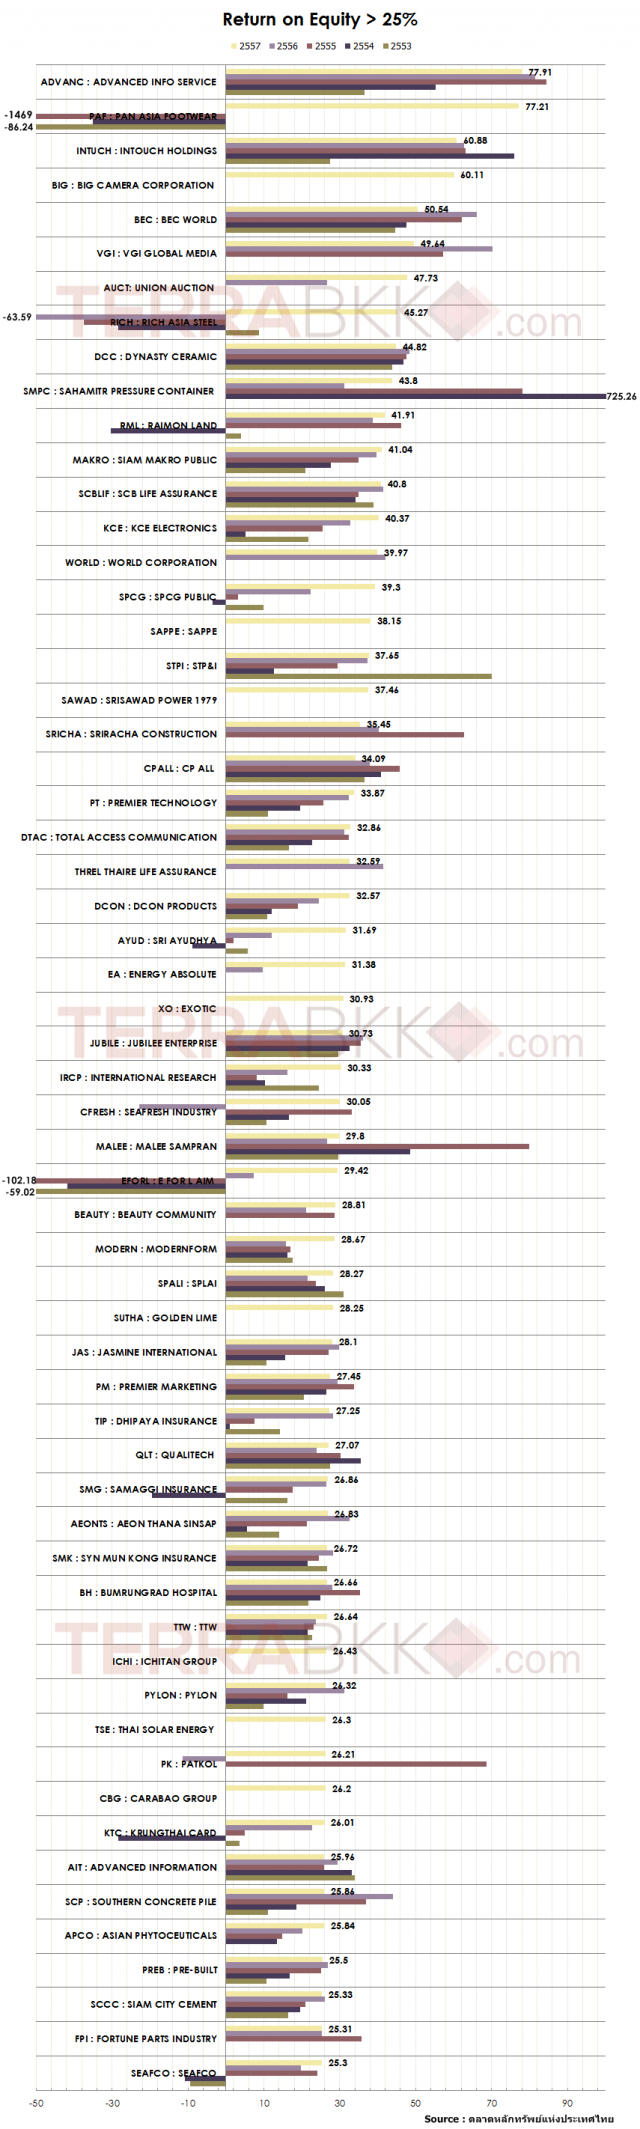
TerraBKK Research เป็นผู้รวบรวมข้อมูลรายชื่อบริษัทไทยที่มี ROE มากกว่า 25% ที่น่าสนใจเอาไว้ให้ไปลองศึกษาเพิ่มเติมในหุ้นที่น่าสนใจ
ที่มา terrabkk.com