Topic List
เช้าวันนี้ MariaDB หยุดทำงาน (อีกแล้ว....)
ก่อนอื่นให้ปิดเว็บก่อน เพื่อไม่ให้มี request เข้ามาค้างในระบบ
sudo service nginx stop
แล้วตรวจสอบ error
sudo journalctl -f -u mariadb.service --since=today
Loaded: loaded (/usr/lib/systemd/system/mariadb.service; enabled; preset: enabled)
    Drop-In: /etc/systemd/system/mariadb.service.d
             └─mariadb_custom.conf, migrated-from-my.cnf-settings.conf
     Active: activating (auto-restart) (Result: resources) since Tue 2026-07-07 06:55:31 +07;>
       Docs: man:mariadbd(8)
             https://mariadb.com/kb/en/library/systemd/
      Tasks: 40 (limit: 251281)
     Memory: 20.3G (peak: 25.9G swap: 781.1M swap peak: 797.6M)
        CPU: 1d 15h 15min 2.877s
sudo dmesg -T | grep -i -E 'oom|kill|mariadb'
ไม่พบอะไร
จาก error message ดูเหมือน
Looking at your status output, your server is using massive amounts of memory (20.3G currently active, 25.9G peak). This almost always means MariaDB is crashing due to the Linux Out-Of-Memory (OOM) killer.
กิน memory มากเกินจนค้าง zombi เลยสั่ง kill (17732) ซะ
sudo service mariadb stop
ps aux | grep mariadb
sudo kill -9 xxxxx
Reset mariadb error ก่อน แล้วค่อยสั่ง start ใหม่
sudo systemctl reset-failed mariadb.service
sudo systemctl daemon-reload
sudo systemctl start mariadb.service
sudo systemctl status mariadb.service
หลังจากนั้นก็ตรวจสอบและซ่อมแซมตารางที่พัง
sudo mariadb-check --all-databases --auto-repair
อย่าลืมเปิด nginx กลับมาด้วย
sudo service nginx start
จบ
ปล. กรณีนี้ การซ่อมแซมอัตโนมัติไม่สำเร็จ ต้องเข้าไปซ่อมเองที่ phpmyadmin
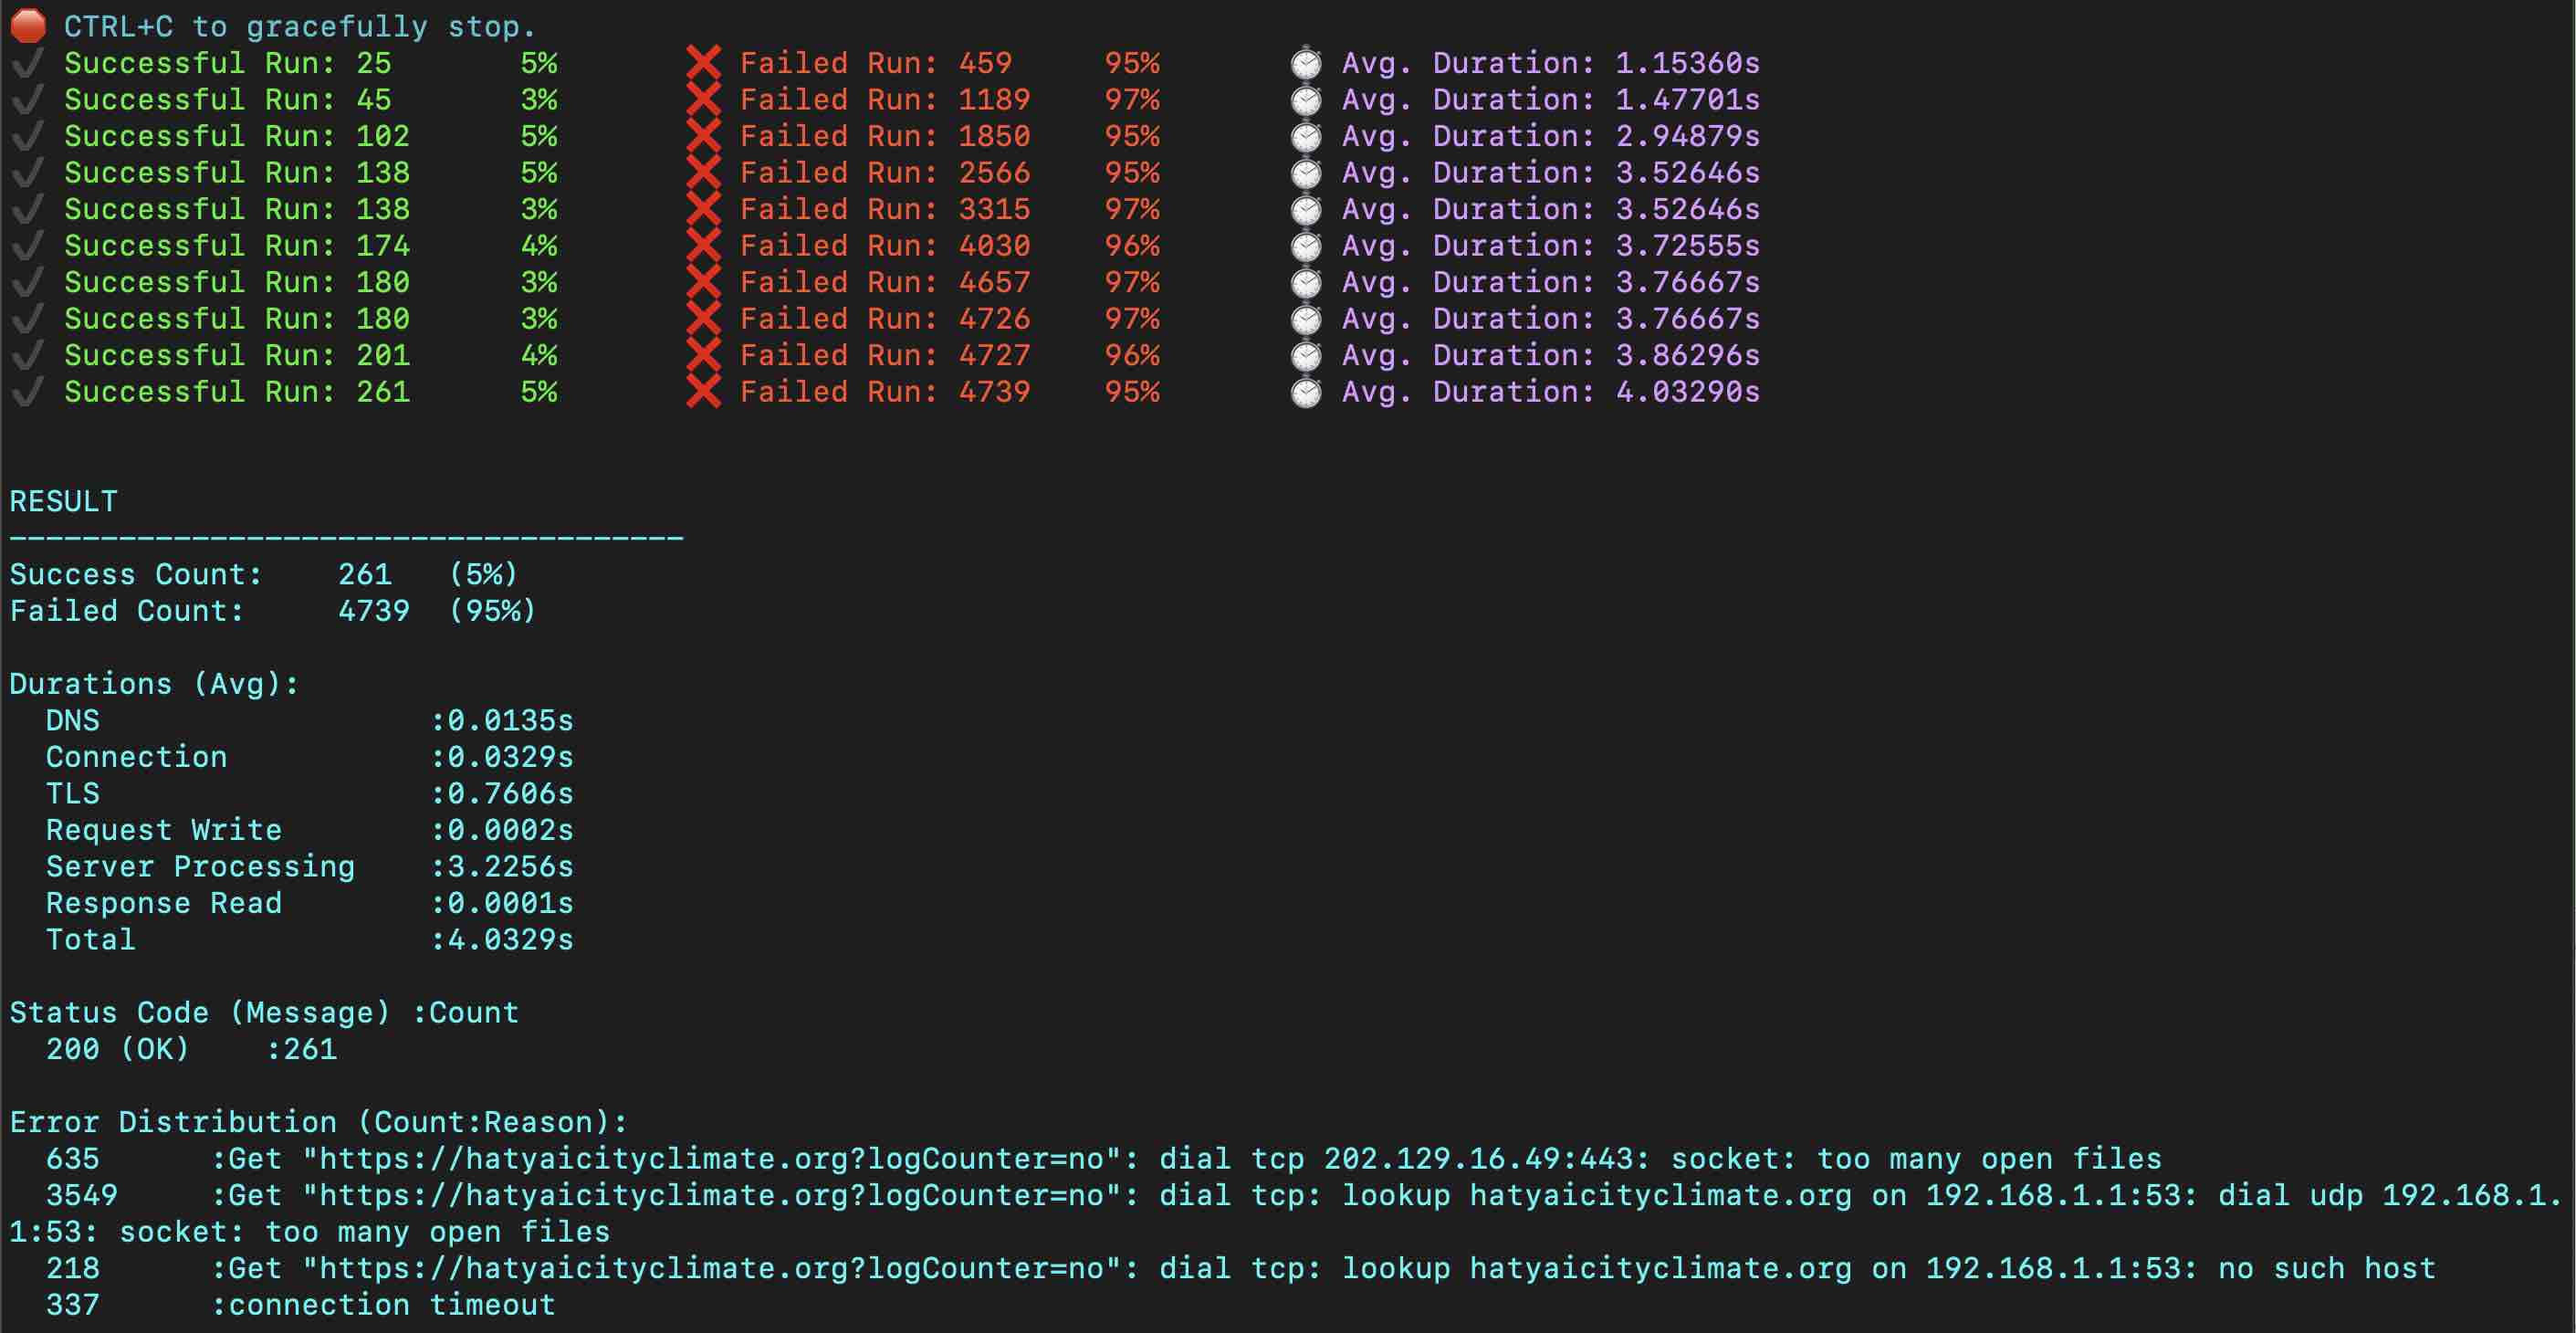
ทดลองทำ Load Test กับ server
ddosify -t "http://localhost/seti/softganz.com?logCounter=no" -m GET -n 5000 -d 60 -T 10
ผล ไม่ผ่าน
RESULT
Success Count: 261 (5%)
Failed Count: 4739 (95%)
เดี๋ยวค่อยมาเขียนรายละเอียด
Install Apache
Location of Apache config file is /opt/homebrew/etc/httpd/httpd.conf Change www home folder
mv /opt/homebrew/var/www /opt/homebrew/var/www.bak
ln -s /Users/httpdocs /opt/homebrew/var/www
brew services restart apache2
brew tap shivammathur/php
เลือกมาสักเวอร์ชั่น
brew install shivammathur/php/php@5.6
brew install shivammathur/php/php@7.0
brew install shivammathur/php/php@7.1
brew install shivammathur/php/php@7.2
brew install shivammathur/php/php@7.3
brew install shivammathur/php/php@7.4
brew install shivammathur/php/php@8.0
brew install shivammathur/php/php@8.1
brew install shivammathur/php/php@8.2
Mac M1 : Config file อยู่ที่
/opt/homebrew/etc/php/7.0/php.ini
/opt/homebrew/etc/php/7.1/php.ini
/opt/homebrew/etc/php/7.2/php.ini
/opt/homebrew/etc/php/7.3/php.ini
/opt/homebrew/etc/php/7.4/php.ini
/opt/homebrew/etc/php/8.0/php.ini
/opt/homebrew/etc/php/8.1/php.ini
/opt/homebrew/etc/php/8.2/php.ini
Mac Intel : Config file อยู่ที่
/usr/local/etc/php/5.6/php.ini
/usr/local/etc/php/7.0/php.ini
/usr/local/etc/php/7.1/php.ini
/usr/local/etc/php/7.2/php.ini
/usr/local/etc/php/7.3/php.ini
/usr/local/etc/php/7.4/php.ini
/usr/local/etc/php/8.0/php.ini
ผลลัพท์ตอนติดตั้ง
To enable PHP in Apache add the following to httpd.conf and restart Apache:
    LoadModule php7_module /usr/local/opt/php@7.4/lib/httpd/modules/libphp7.so

<FilesMatch .php$>
    SetHandler application/x-httpd-php
</FilesMatch>


Finally, check DirectoryIndex includes index.php
    DirectoryIndex index.php index.html

The php.ini and php-fpm.ini file can be found in:
    /usr/local/etc/php/7.4/

php@7.4 is keg-only, which means it was not symlinked into /usr/local,
because this is an alternate version of another formula.

If you need to have php@7.4 first in your PATH, run:
  echo 'export PATH="/usr/local/opt/php@7.4/bin:$PATH"' >> ~/.zshrc
  echo 'export PATH="/usr/local/opt/php@7.4/sbin:$PATH"' >> ~/.zshrc

For compilers to find php@7.4 you may need to set:
  export LDFLAGS="-L/usr/local/opt/php@7.4/lib"
  export CPPFLAGS="-I/usr/local/opt/php@7.4/include"<br />
<br />
<br />
To start shivammathur/php/php@7.4:
  brew services start shivammathur/php/php@7.4
Or, if you don't want/need a background service you can just run:
  /usr/local/opt/php@7.4/sbin/php-fpm --nodaemonize
เปลี่ยนลิงก์
brew unlink php && brew link --overwrite --force php@7.4
Apache
แก้ไขไฟล์ /opt/homebrew/etc/httpd/httpd.conf /etc/apache2/httpd.conf หรือ /usr/local/etc/httpd/httpd.conf file scroll to the bottom of the LoadModule entries.
 LoadModule php5_module /usr/local/opt/php@5.6/lib/httpd/modules/libphp5.so
 <a class="hashtag" href="/tags/LoadModule">#LoadModule</a> php7_module /usr/local/opt/php@7.0/lib/httpd/modules/libphp7.so
 <a class="hashtag" href="/tags/LoadModule">#LoadModule</a> php7_module /usr/local/opt/php@7.1/lib/httpd/modules/libphp7.so
 <a class="hashtag" href="/tags/LoadModule">#LoadModule</a> php7_module /usr/local/opt/php@7.2/lib/httpd/modules/libphp7.so
 <a class="hashtag" href="/tags/LoadModule">#LoadModule</a> php7_module /usr/local/opt/php@7.3/lib/httpd/modules/libphp7.so
 <a class="hashtag" href="/tags/LoadModule">#LoadModule</a> php7_module /usr/local/opt/php@7.4/lib/httpd/modules/libphp7.so
 <a class="hashtag" href="/tags/LoadModule">#LoadModule</a> php_module /usr/local/opt/php@8.0/lib/httpd/modules/libphp.so
 <a class="hashtag" href="/tags/LoadModule">#LoadModule</a> php_module /usr/local/opt/php@8.1/lib/httpd/modules/libphp.so
ใช้ sphp เป็นตัวเปลี่ยน version จะสะดวกกว่า
curl -L https://gist.githubusercontent.com/rhukster/f4c04f1bf59e0b74e335ee5d186a98e2/raw/adc8c149876bff14a33e3ac351588fdbe8172c07/sphp.sh > /opt/homebrew/bin/sphp
chmod +x /opt/homebrew/bin/sphp
sphp 8.1
Install MariaDB
brew install mariadb
Restart MariaDB
Auto start
brew services start mariadb
Manual start
mysql.server restart
Location of database is /opt/homebrew/var/mysql, If you want to change use symbolic link to new location
brew services stop mariadb
cp -R /opt/homebrew/var/mysql /Users/mysql
mv /opt/homebrew/var/mysql /opt/homebrew/var/mysql.bak
mkdir /opt/homebrew/var/mysql
ln -s /Users/mysql /opt/homebrew/var/mysql
brew services start mariadb
MariaDB Configuration
แก้ไขไฟล์ /opt/homebrew/etc/my.cnf.d/my.cnf
[mysqld]
sqlmode="NOFIELDOPTIONS"
  # Avaliable Mode<br />
  # "NOFIELDOPTIONS,IGORESPACE,NOZEROINDATE,NOZERODATE,ERRORFORDIVISIONBYZERO,NOAUTOCREATEUSER,NOENGINESUBSTITUTION"
default-storage-engine = MYISAM
character-set-server = utf8
  <a class="hashtag" href="/tags/collation">#collation</a>-server = utf32unicodeci
หากไม่ต้องการให้ตรวจสอบการบันทึกข้อมูลของฟิลด์ เช่น ข้อมูลยาวเกินกว่าที่กำหนดในฟิลด์ ให้กำหนด mode เป็น NOFIELDOPTIONS
ที่มา
ติดตั้ง Server ใหม่ของ Ubuntu Server เขียนบันทึกคำสั่งไว้สักหน่อย
Apache Installation
sudo apt update
sudo apt upgrade

sudo apt install apache2 -y
systemctl status apache2

sudo a2dismod ssl
sudo a2enmod ssl
sudo a2enmod rewrite
Apache config
sudo nano /etc/apache2/sites-available/000-default.conf
เพิ่ม AllowOverride Al
<Directory /home/>
        Options Indexes FollowSymLinks
        Options FollowSymLinks
        AllowOverride All
        Order allow,deny
        allow from all
        Require all granted
</Directory>
sudo apt-get install mariadb-server mariadb-client systemctl status mariadbsudo nano /etc/mysql/conf.d/mysqld.cnf sudo systemctl restart mysql
debian : service mysqld restart
กรณีที่ติดตั้ง mariadb แล้วไม่ได้กำหนดรหัสของ root
mysql --versionsystemctl stop mariadb systemctl set-environment MYSQLD_OPTS="--skip-grant-tables --skip-networking" systemctl start mariadb mysql -u root
mysql> FLUSH PRIVILEGES; mysql> SET PASSWORD FOR 'root'@localhost = PASSWORD("newpassword"); mysql> quit
sudo systemctl unset-environment MYSQLD_OPTS sudo systemctl restart mariadb
mysql -u root -p
mysql> CREATE USER 'newuser'@'localhost' IDENTIFIED BY 'password'; mysql> GRANT ALL PRIVILEGES ON * . * TO 'newuser'@'localhost';
#MySql Config
ตรวจสอบว่าควรกำหนดค่า keybuffersize สักเท่าไหร่ดี
SELECT CONCAT(ROUND(KBS/POWER(1024,
    -> IF(PowerOf1024<0,0,IF(PowerOf1024>3,0,PowerOf1024)))+0.4999),
    -> SUBSTR(' KMG',IF(PowerOf1024<0,0,
    -> IF(PowerOf1024>3,0,PowerOf1024))+1,1))
    -> recommendedkeybuffersize FROM
    -> (SELECT LEAST(POWER(2,32),KBS1) KBS
    -> FROM (SELECT SUM(indexlength) KBS1
    -> FROM informationschema.tables
    -> WHERE engine='MyISAM' AND
    -> tableschema NOT IN ('information_schema','mysql')) AA ) A,
    -> (SELECT 2 PowerOf1024) B;
name /etc/my.cnf
 <a class="hashtag" href="/tags/MyISAM">#MyISAM</a>
key_buffer_size=4096M
join_buffer_size=256K  # from 140M for row pointers
thread_cache_size=40  # from 8 to avoid thread starvation
query_cache_limit=8M  # from 4M since you have QC turned OFF
key_cache_age_threshold=7200  # from 300 seconds to reduce key_reads RPS
key_cache_division_limit=50  # from 100 percent for HOT/WARM caches
key_cache_block_size=16K  # from 1K to evict bigger block when full
open_files_limit=30000  # from 1024 to reduce opened_files RPS
table_open_cache=10000  # from 407 to reduce opened_tables RPS
table_definition_cache=2000  # from 603 to reduce opened_table_definitions RPS
max_heap_table_size=48M  # from 32M  for additional capacity
tmp_table_size=48M  # from 32M to reduce created_tmp_disk_tables count
innodb_io_capacity=1600  # from 200 to allow more IOPS
read_rnd_buffer_size=192K  # from 256K to reduce handler_read_rnd_next RPS
sort_buffer_size=2M  # from 256K to reduce sort_merge_passes count

 <a class="hashtag" href="/tags/Innodb">#Innodb</a>
<a class="hashtag" href="/tags/innodb">#innodb</a>_buffer_pool_size = 6144M
innodb_log_file_size = 512M
innodb_lru_scan_depth=100  # from 1024 to reduce CPU busy every SE$

max_connections = 500
key_buffer_size = 512M
ติดตั้ง PHP => How to install PHP 7.4 on Ubuntu 22.04 LTS Jammy Linux
sudo apt update && sudo apt upgrade
sudo apt install software-properties-common
sudo add-apt-repository ppa:ondrej/php -y

sudo apt install php7.4
sudo apt install php7.4-{cli,common,curl,zip,gd,mysql,xml,mbstring,json,intl}

sudo update-alternatives --config php
sudo apt-get install php7.4 php7.4-mysql php-common php7.4-cli php7.4-json php7.4-common php7.4-opcache libapache2-mod-php7.4

sudo nano /etc/php/7.4/fpm/php.ini

sudo systemctl restart apache2
sudo systemctl restart mysql

wget -r --ask-password ftp://user:example.com/
Install phpMyAdmin
sudo apt install phpmyadmin php-mbstring php-zip php-gd php-json php-curl
Mount volumn จาก server เดิม มาไว้ใน server ใหม่ เพื่อทำการ copy file
sudo apt install sshfs

mkdir folder
sshfs -p 22 username@example.com:/home/folder/ folder
ใช้งานเสร็จก็ un mount
umount folder
Configuration
ที่มา
- How to install LAMP stack web server on Ubuntu 20.04
- How To Create a New User and Grant Permissions in MySQL
- How to recursively download a folder via FTP on Linux
- How can I disable and enable SSL in Apache
- How To Reset Your MySQL or MariaDB Root Password on Ubuntu 18.04
- How to enable mod_rewrite in apache ubuntu
- How to install PHP 7.4 on Ubuntu 22.04 LTS Jammy Linux
รอก่อนนะ ค่อยกลับมาทยอยเขียน
Edit Apache config
sudo nano /etc/apache2/httpd.conf
ServerName my.local.:80

<Directory "/">
AllowOverride All
Require all denied
</Directory>

<Directory "/Library/WebServer/Documents">
AllowOverride All
</Directory>
Restart Apache
sudo apachectl restart
sudo apachectl -k graceful
Edit MariaDB config
nano ~/.my.cnf
Restart MariaDB
Auto start
brew services start mariadb
Manual start
mysql.server restart
Configuration
PHP Config
nano /usr/local/etc/php/8.0/php.ini
...
post_max_size = 1024M
upload_max_filesize = 1024M
...
ที่มา
แปะไว้ก่อน ค่อยมาเขียนรายละเอียดนะครับ
sudo nano /etc/php/7.4/fpm/php.ini sudo systemctl restart apache2sudo nano /etc/mysql/conf.d/mysqld.cnf sudo systemctl restart mysql
mkdir remotefolder sshfs -p 22 username@example.com:/home/folder/ remotefolder umount remotefolder
sshfs -p 22 username@example.com:/home/user/domains/example.com/public_html/ remotefolder nohup rsync -trv remotefolder/path/ path/ &
sudo apt update<br /> sudo apt upgrade
sudo apt install apache2 -y systemctl status apache2
sudo a2dismod ssl sudo a2enmod ssl<br /> <br /> <br />
apt install php7.4 php7.4-mysql php-common php7.4-cli php7.4-json php7.4-common php7.4-opcache libapache2-mod-php7.4
apt install mariadb-server mariadb-client systemctl status mariadb
mysql> CREATE USER 'newuser'@'localhost' IDENTIFIED BY 'password'; mysql> GRANT ALL PRIVILEGES ON * . * TO 'newuser'@'localhost';<br /> <br /> <br />
sudo systemctl restart apache2<br /> sudo systemctl restart mysql<br /> <br /> <br /> wget -r --ask-password ftp://user:server.com/
- https://upcloud.com/community/tutorials/installing-lamp-stack-ubuntu/?utmterm=&utmcampaign=DSA&utmsource=adwords&utmmedium=ppc&hsaacc=9391663435&hsacam=7185608860&hsagrp=81739862313&hsaad=391197952986&hsasrc=g&hsatgt=dsa-460992423274&hsakw=&hsamt=b&hsanet=adwords&hsaver=3&gclid=CjwKCAiAeb-BRB2EiwAGBnXXuae-7ru2jsgSAiku6bX0k7XucjvKLGBQkSm-DKo92SXjG1odKAeRoCid0QAvD_BwE - https://www.digitalocean.com/community/tutorials/how-to-create-a-new-user-and-grant-permissions-in-mysql - https://stackoverflow.com/questions/113886/how-to-recursively-download-a-folder-via-ftp-on-linux - https://askubuntu.com/questions/709594/how-can-i-disable-and-enable-ssl-in-apache-without-a-command-if-possible
Apache Tuning from How To Optimize Apache
Timeout 300
KeepAlive On
MaxKeepAliveRequests 100
KeepAliveTimeout 15
MinSpareServers 5
MaxSpareServers 10
StartServers 5
MaxClients 150
MaxRequestsPerChild 0
Create new user how
sudo adduser userName
Make user sudo how
sudo adduser userName sudo
MySQL Configuration
- Increrase memory size for MySQL Server using nano /etc/my.cnf and add/change value ตามรายละเอียด
innodbbufferpoolsize = 2048M
innodblogfilesize = 512M
maxconnections = 500
keybuffer_size = 512M
PHP Config
Set timezone to Asia/Bangkok
nano /etc/php/7.4/apache2/php.ini
date.timezone = Asia/Bangkok
Add CNAME domain.com to ppi.psu.ac.th
Add new site to Apache
cd /etc/apache2/sites-available
nano sites-available/doname.com.conf
<VirtualHost *:80>
    ServerName domain.com
    ServerAdmin webmaster@localhost
    DocumentRoot /var/www/html/domain.com
</VirtualHost>
<VirtualHost *:80>
    ServerName www.domain.com
    ServerAdmin webmaster@localhost
    DocumentRoot /var/www/html/domain.com
</VirtualHost>

<IfModule mod_ssl.c>
<VirtualHost _default_:443>
    ServerName domain.com
    ServerAdmin webmaster@localhost
    DocumentRoot /home/user/domains/domain.com
</VirtualHost>
<VirtualHost _default_:443>
    ServerName www.domain.com
    ServerAdmin webmaster@localhost
    DocumentRoot /home/user/domains/domain.com
</VirtualHost>
</IfModule>
cd /etc/apache2/sites-enabled
ln -s ../sites-available/domain.com.conf domain.com.conf
Restart Apache
systemctl restart apache2
Restart MySql
systemctl restart mysql
INSTALL Let's Encrypt
1. ติดตั้งด้วย snap ดูรายละเอียดได้ที่ Certbot instructions
snap install --classic certbot
ln -s /snap/bin/certbot /usr/bin/certbot
certbot --apache
certbot certonly --apache
certbot renew --dry-run
2. ติดตั้งด้วย apt-get จาก repo
apt-add-repository -r ppa:certbot/certbot
After that, the following commands do not generate any errors:
apt update
apt-get update
apt install python3-certbot-apache
certbot --apache -d domain.com -d www.domain.com
You should test your configuration at:
https://www.ssllabs.com/ssltest/analyze.html?d=domain.com
IMPORTANT NOTES:
Congratulations! Your certificate and chain have been saved at:
- /etc/letsencrypt/live/domain.com/fullchain.pem
- Your key file has been saved at:
- /etc/letsencrypt/live/domain.com/privkey.pem
- Your cert will expire on 2021-01-08. To obtain a new or tweaked version of this certificate in the future, simply run certbot again with the "certonly" option. To non-interactively renew all of your certificates, run "certbot renew"
To test the renewal process, you can do a dry run with certbot:
sudo certbot renew --dry-run
Correct way to completely remove issued certificate(s) for a domain
certbot delete --cert-name domain.com
Copy file from another server using SSH
Alternatively, you could mount the myserver's filesystem over SSH with sshfs. This may be too much hassle for a one-off need, but convenient if you do this sort of thing often.
mkdir myserver
sshfs -p 22 domain.com:/path/ myserver
wget -O ~/myserver/path/to/remote/destination http://www.example.com/whatever

rsync -trv myserver/src/path/ dest/path/
umount myserver
rsync in background
nohup rsync -trv myserver/src/path/ dest/path/ &
Dump Database
mysqldump -u [username] -p [database-you-want-to-dump] > [path-to-place-data-dump.sql]
/usr/local/mysql/bin/mysqldump -u [username] -p [database-you-want-to-dump] > [path-to-place-data-dump.sql]
Ways to Flush DNS Cache on Mac OSx
sudo killall -HUP mDNSResponder
WhoIs LookUp
nslookup -type=ns softganz.com
Setup Time Sync
ติดตั้ง
apt-get install ntp
แก้ไข config
nano /etc/ntp.conf
เปลี่ยน server เป็น
server 1.th.pool.ntp.org
server 0.asia.pool.ntp.org
server 2.asia.pool.ntp.org
server clock.nectec.or.th
Restart
service ntpd restart
หรือ
service ntp restart
ที่มา
- Certbot instructions
- How To Secure Apache with Let's Encrypt on Ubuntu 18.04
- E: The repository 'http://ppa.launchpad.net/certbot/certbot/ubuntu focal Release' does not have a Release file
- How To Use SSHFS to Mount Remote File Systems Over SSH
- How to wget a file to a remote machine over SSH?
- Correct way to completely remove issued certificate(s) for a domain
- How to increase memory size for MySQL Server
- MySQL Performance Tuning Settings
- HOWTO: Sync เวลาไม่ควรใช้ ntpdate ควรใช้ ntpd แทน
umount -l /dev/sda1
e2fsck -cfpv /dev/sda1 > chresult.txt&
sudo apt-get install netatalk
sudo nano /etc/netatalk/AppleVolumes.default
/shares "Shares" /media/user/VolumeName "ShareName"
sudo /etc/init.d/netatalk restart
เข้าสู่ยุค https จึงจำต้องทำเสียแล้ว
มาลองติดตั้ง Let's Encrypt บน Directadmin กันอีกสักรอบ
1. เริ่มด้วยการแก้ไข config ของ Directadmin ให้สามารถใช้งาน Let's Encrypt ก่อน
nano /usr/local/directadmin/conf/directadmin.conf
สำหรับใครที่ใช้ path : /var/www/html/.well-known (ใช้โดเมนเดียว) ให้เพิ่ม
enable_ssl_sni=1
letsencrypt=1
ส่วนใครที่ใช้ path : /home/user/domains/domain.com/public_html/.well-known (ใช้หลายโดเมน) ให้เพิ่ม
enable_ssl_sni=1
letsencrypt=2
หรือจะสั่งผ่าน Terminal ก็ได้โดย
echo enable_ssl_sni=1 >> /usr/local/directadmin/conf/directadmin.conf
echo letsencrypt=2 >> /usr/local/directadmin/conf/directadmin.conf
แล้วสั่ง update config โดย
cd /usr/local/directadmin/custombuild
./build update
./build rewrite_confs
2. แล้วมาเพิ่ม Let's Encrypt ให้กับแต่ละเว็บ
กำหนดให้เว็บสามารถใช้งาน Secure SSL ก่อน
แล้วจึงไปเพิ่ม SSL Certificates ให้กับเว็บ โดยเลือก Free & automatic certificate from Let's Encrypt
(ต้องทำทั้ง www และ ไม่มี www)
ถ้าต้องการให้สามารถใช้งานได้ทั้ง https และ http ให้สร้าง link private _ html ให้ชี้ไปที่ public _ html ด้วยคำสั่ง
ln -s public _ html private _ html
แต่ถ้าต้องการให้ใช้งานเฉพาะ https อย่างเดียว ให้ rename public _ html ไปเป็น private _ html แล้วสร้าง folder public _ html ใหม่ และสร้างไฟล์ .htaccess โดยเพิ่มคำสั่ง
RewriteCond %{HTTPS} off
RewriteRule (.*) https://%{HTTP_HOST}%{REQUEST_URI}
Let's Encrypt ก็จะเป็นของเรา